In this blog I write all the activities I do, which are mainly in the embedded electronics and robotics field. I also share here my political opinions and my experiences in life
Smartphones gives us a wide range of applications that help us organize our selves, play and wake up on time, but if only there is a way to connect our phones to the real world to control hardware stuff like house lighting system or the garage door. Smartphones have a bunch of possibilities including sensors like GPS, accelerometers and temperature, a decent cpu for processing data but the most important feature a smartphone can give is its portability.
In 2011 Google starts a project called Android ADK: http://accessories.android.com/ the Android accessory kit, that can make your phone communicate to devices (accessories) by make a bridge between the power of android devices and the real world through a simple USB communication. This bridge can solve so many problems :D
So I thought to try it out with an arduino ADK board. The project I've done is to control a led and a DC motor From the Android to the arduino passing by xbee modules.
The next diagram explains entities communication:
The code has three sides:
The Android side : sending commands through ADK
The Arduino ADK Side: Receiving commands and send it wirelessly to other arduino boards with xbee
The Arduino Uno Side: Receiving commands from xbee and control the DC motor and the led.
This is my first android application, it consists of something that I actually need during making electronic projects where there are so many resistors in the table and I can't just figure out the value of each one of them at a glance.
Resistors used code colors, and each color according to its position has a specific value.
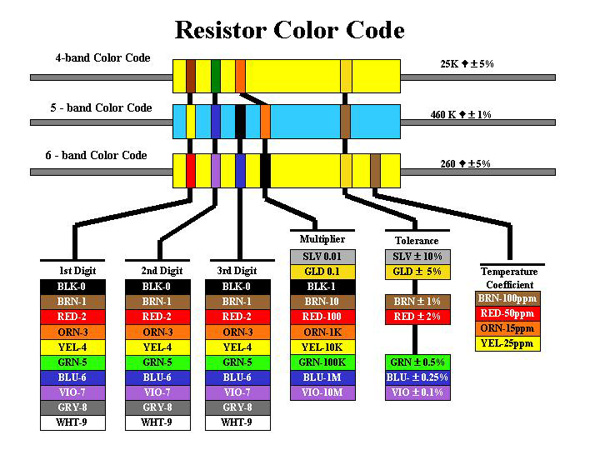
A resistor can have 4, 5 or 6 color bands just like the following picture:
Each color rank have a specific meaning in each Resistor type. For example the third band (from the left) of a 4 band resistor is a multiplier digit, but in the 5 band resistor it is the unity digit.
The previous picture shows a resistor with 4 color bands, organized as follow (from left to right)
Brown, Black, Red, Gold
10*10^ 2 +/- 5% = 1K ohm with 5% tolerance
For more information about how to calculate resistor color code, please refer to this wonderful wekipedia article: http://fr.wikipedia.org/wiki/CEI_60757
I actually use this mnemonic in french "ne mange rien ou jeuner voila bien votre grande bétise" to remember the mean of each color in the resistance' but sometimes that could be very confusing, so I thought to create an android app that help with that.
I know that there is many android app doing that, but I did wanted to learn android too :D
The Android application:
In the Main activity, there are 3 buttons for each kind of resistor:
Each button open a new Activity through a simple intent in its OnClickListener() as follow:
btn4BandResistance.setOnClickListener(new OnClickListener() {

   @Override
   public void onClick(View v) {
    Intent intent4 = new Intent(MainActivity.this,BandResistor4.class);
    startActivity(intent4);
   }
  });
A new Activity opens, I used The Spinner View to choose from one of the predefined colors, and TextViews to show result:
I used a function that is called in each OnItemSelectedListener() of each spinner to update the results:
spin1Band4.setOnItemSelectedListener(new OnItemSelectedListener() {

   @Override
   public void onItemSelected(AdapterView arg0, View arg1,
     int arg2, long arg3) {

    update4BandResistance();
   }

   @Override
   public void onNothingSelected(AdapterView arg0) {
    // TODO Auto-generated method stub

   }
  });
the update function link the position of each selected Item to a value already defined in an Array: