lundi 30 janvier 2012

Reading from a Sony joystick


Well this is all started when I wanted to send data from a joystick to my laptop to control a robot. What seemed to be obvious for me is that I have to use one of the gaming library to interface my joystick.
after a lot of researches I found 2 decent library the XNA framework and the SlimDx library.
I didn't know why but I didn't like these frameworks.
So I thought .. the joystick is an HID device hence I can interface it just like any other HID device
I started with searching HID library fot c#. I found libusbdotnet seemed intresting but lack of documentation. then I found the USBHIDLIBRARY and I work on it.
This library is just amazing not so complex, simple documentation and does the job properly.
Here is my C# code for interfacing the joystick:

using System;
using System.Collections.Generic;
using System.ComponentModel;
using System.Data;
using System.Drawing;
using System.Linq;
using System.Text;
using System.Windows.Forms;
using USBHIDDRIVER.USB;
using USBHIDDRIVER.TESTS;
using USBHIDDRIVER.List;
using USBHIDDRIVER;
using System.Threading;

namespace USBWork
{
    public partial class Form1 : Form
    {
        USBHIDDRIVER.USBInterface usb = new USBInterface("vid_0079", "pid_0006");
        byte[] currentread=new byte[1024];

        public Form1()
        {
            InitializeComponent();
        }

        private void button1_Click(object sender, EventArgs e)
        {
            USBHIDDRIVER.USBInterface usb = new USBInterface("vid_0079", "pid_0006");
            if (usb.Connect()) lblcnx.BackColor = Color.Green;
        }

        private void usbEventHandler(object sender, EventArgs args)
        {
            lblreading.BackColor = Color.Green;
            ListWithEvent list = (ListWithEvent)sender;
            byte[] byte_array = (byte[])list[list.Count-1];
            //txtusb.Text = "start!\n";
            for (int i = 0; i < byte_array.Length; i++)
            {
                currentread[i] = byte_array[i];
            }
          
          
         }
       
            private void btnread_Click(object sender, EventArgs e)
            {
                usb.enableUsbBufferEvent(new EventHandler(usbEventHandler));
                usb.startRead();
                timer1.Enabled = true;
            }

            private void Form1_FormClosing(object sender, FormClosingEventArgs e)
            {
                usb.stopRead();
            }

            private void timer1_Tick(object sender, EventArgs e)
            {
                txtusb.Text+= currentread[6].ToString();
                if (currentread[6] == 15) chknone.Checked = true; else chknone.Checked = false;
                if (currentread[6] == 143) chkcercle.Checked = true; else chkcercle.Checked = false;
                if (currentread[6] == 31) chktriangle.Checked = true; else chktriangle.Checked = false;
                if (currentread[6] == 47) chkcarreau.Checked = true; else chkcarreau.Checked = false;
                if (currentread[6] == 79) chkX.Checked = true; else chkX.Checked = false;
            }          
                  
        }      

 }


mercredi 25 janvier 2012

UART and RS232 communication

Hello,
today I'm going to show you how to communicate through uart with the RS232 protocol.
how to send and extract data.
let's start with the sending.
with Mikroc you can send to types of data (character and text).
A character can have a value from 0 to 255 but a text is a string of characters.
To do so we need to call the "UART library" from Mikroc

This program sends a character (or a number less then 256) if a request was demanded;

unsigned char read=0
Void main(){
     uart1_init(9600);
while(1){
   if (uart1_data_ready()==1){
       read=uart1_read();
      uart1_write(read);
 }
}
}

this program read a string of characters then resend this string
char txt[120];
void main(){
   uart1_init(9600);
while(1){
    uart1_read_text(txt,"#" ,255);
uart1_write(10);
uart1_write(13);
uart1_write_text(txt);
}
}

What about the electronics:

The UART protocol is amazing but we can't communicate with a PC using it so we have to convert this protocol to an other one that is adopted by PC, the great one is the famous RS232 protocol.
RS232 is very close to the UART protocol the only difference is the logic level:
RS232: 1-->+12V 0-->-12V
UART: 1-->5V 0-->0V
So all we have to do is to find a way to convert the logic level from PC to PIC and From PIC to PC
The best solution is the one provided by Maxim the MAX232 circuit:
This little circuit does the job quite well.
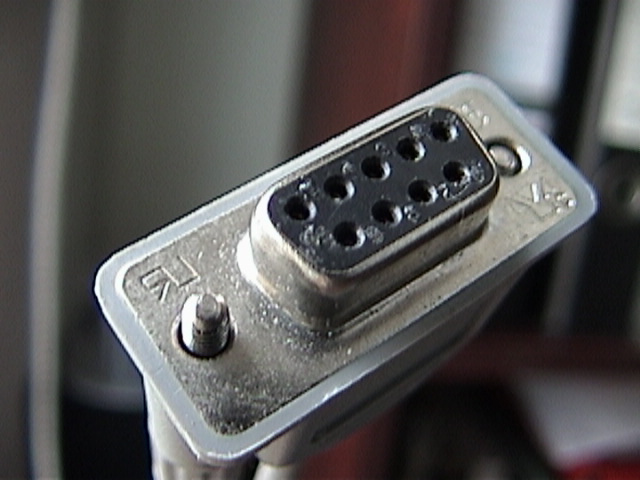
The RS232 protocol use the DB9 port on PC but we can't find this port a new PCs that's why we need a converter from the RS232 to USB we use (just like its function) a converter cable from RS232 to USB just like this one:

Some cables requires a driver to be installed so you need to find the right one.
Linking....
The best circuit that I personally tried it is this one and it works amazingly:
 

samedi 21 janvier 2012

A simple example of Gmap.net with c#

This tutorial is specially made for a member in my team Explorer who has the task to locate the position of our robot in a  map.
gmap.net is a great .net framework nonetheless it lacks of documentation.
So what I'm going to do is to show you how to refer gmap.net in your application  and how to locate something in the world map.
So let's get started!

First of all we need to download the binary package which contains all the *.dll that we need.
http://greatmaps.codeplex.com/releases/view/20235#DownloadId=67818
extract the folder in a decent place, say for exemple c:\\projects\
we will need only 2 files:
GMap.NET.Core.dll
GMap.NET.WindowsForms.dll
Now we will add the GMap.NET.WindowsForms.dll to our Visual Studio IDE toolbox.
to do so go to tools-->choose toolbox items

before clicking brows, make sure you selected the ".NET Framework Components"
Select the Gmap.NET.WindowsForms.dll
click Open or "ouvrir" the click ok
now go to your toolbox (view-->toolbox) you should find a new control the "GmapControl".


Next step  is even more simple :))
we need to add a reference to our new library in our projects so go to:
(view-->Solution explorer)
Select the GMap.NET.Core.dll click Ok
Note that the reference are being added to your projects reference,
we can now go back to the design and set our gmap control


Right click on the control and choose "propoerties"
In the properties windows set the Name to "mapexplr"

Finally we can start coding

Add these lines to the using lines
using GMap.NET.WindowsForms;
using GMap.NET;
using GMap.NET.MapProviders;


The Code
namespace WindowsFormsApplication2
{
    public partial class Form1 : Form
    {
        GMapOverlay overlayOne;
        String contry;
        public Form1()
        {
            InitializeComponent();
        }

        private void Form1_Load(object sender, EventArgs e)
        {

        }

        private void mapexplr_Load(object sender, EventArgs e)
        {
            //initialisation de notre map
            mapexplr.SetCurrentPositionByKeywords("Tunisia");
            mapexplr.MapProvider = GMapProviders.BingMap;
            mapexplr.MinZoom = 3;
            mapexplr.MaxZoom = 17;
            mapexplr.Zoom = 5;
            mapexplr.Manager.Mode = AccessMode.ServerAndCache;
            //ajout des overlay
            overlayOne = new GMapOverlay(mapexplr, "OverlayOne");
            //ajout de Markers
            overlayOne.Markers.Add(new                                         GMap.NET.WindowsForms.Markers.GMapMarkerGoogleGreen(new PointLatLng(36.657403,10.327148)));
            //ajout de overlay à la map
            mapexplr.Overlays.Add(overlayOne);
        }
    }
}
The final result:


Love you tunisia !
I hope this tutorial was helpful, till the next time don't stop sharing